![]()

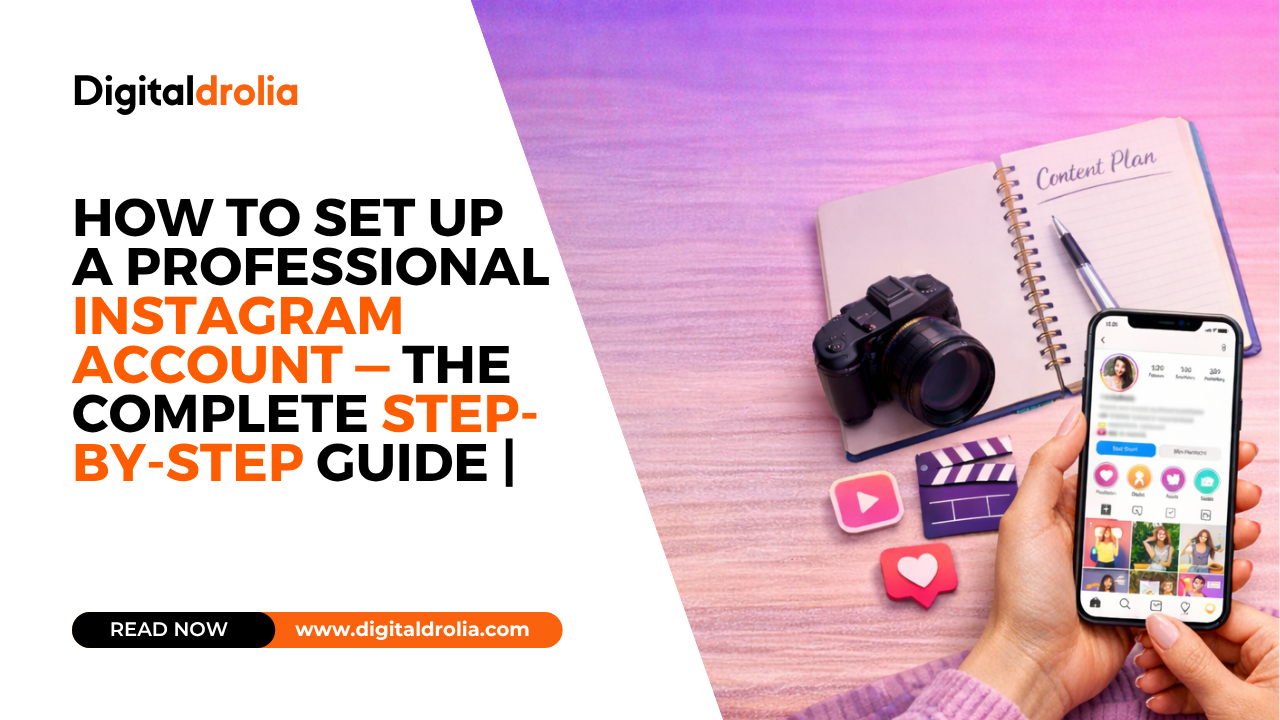
How to Set Up a Professional Instagram Account — The Complete Step-by-Step Guide | Digital Drolia
Here is a question worth sitting with for a moment.
When was the last time you discovered a new restaurant, a new brand, or a new service provider through Instagram? Last week? Yesterday? This morning?
Now flip that around. How many potential customers are discovering businesses just like yours on Instagram every single day — and not finding you?
That gap between where you are and where your customers are looking is exactly why this guide exists.
Instagram has over 2 billion monthly active users. In India alone, it is one of the fastest-growing platforms — with users across every age group, every city, and every interest category actively using it to find products, services, inspiration, and businesses to support. And unlike traditional advertising, Instagram lets even the smallest business compete with the biggest brands — because on Instagram, great content wins, not just big budgets.
But here is the thing: most businesses and creators set up their Instagram accounts wrong. They slap on a profile photo, write a vague bio, post a few times, get confused about why nothing is happening — and either give up or limp along with a page that never reaches its potential.
This guide is going to change that for you.
We are going to walk through every single step of setting up a professional Instagram account — from the very first tap to the finishing touches that most people never even know exist. Not just the how, but the why — so you understand what each element does and how it contributes to your overall success on the platform.
By the end of this guide, you will have an Instagram account that looks professional, communicates clearly, attracts the right audience, and is built to grow.
Let us get started.
Why Instagram Specifically? Understanding the Platform Before You Build On It
Before we talk about setup, let us talk about what Instagram actually is — because understanding the platform’s nature makes every setup decision more intentional.
Instagram is fundamentally a visual discovery platform. Unlike Facebook, which is about connections and conversations, or Twitter which is about real-time information — Instagram is about inspiration, aesthetics, and visual storytelling. People come to Instagram to be moved by images and videos, to discover things they did not know they wanted, and to follow accounts that consistently make them feel something.
This has profound implications for how you set up and run your account.
It means your visual identity matters enormously. A blurry profile photo, an inconsistent feed, or a poorly written bio can cost you followers who would otherwise have been perfect customers.
It means the platform rewards consistency and quality over frequency. Posting one outstanding piece of content per week will outperform posting seven mediocre ones.
It means your audience is visual first. They form an impression of your brand within seconds of landing on your profile — before they read a single word of your bio.
Keep all of this in mind as we go through the setup process. Every decision we make is in service of creating an account that works with Instagram’s nature rather than against it.
Part One — The Technical Foundation
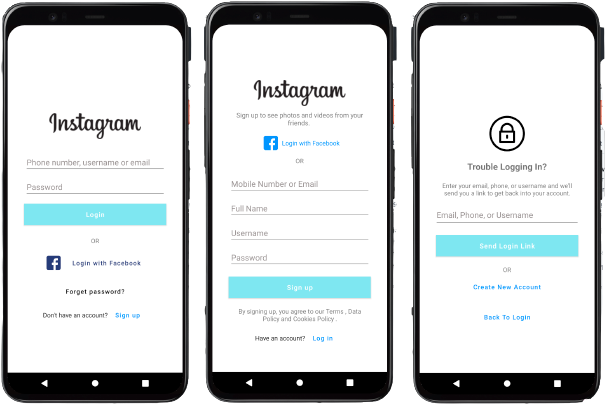
Step 1 — Download the App and Create Your Account
Instagram is primarily a mobile platform. While you can view content on desktop, the app — available on both iOS and Android — is where you will do most of your work.
Download the Instagram app from the App Store or Google Play Store. Open it and tap “Create New Account.”
You will be asked to sign up with either your email address or phone number. For a business account, use your business email address — not a personal one. This keeps things professional and ensures important notifications go to the right place.
Choose a strong password and note it somewhere secure.
Instagram will then ask you to create a username. This is one of the most important decisions you will make — so do not rush it.
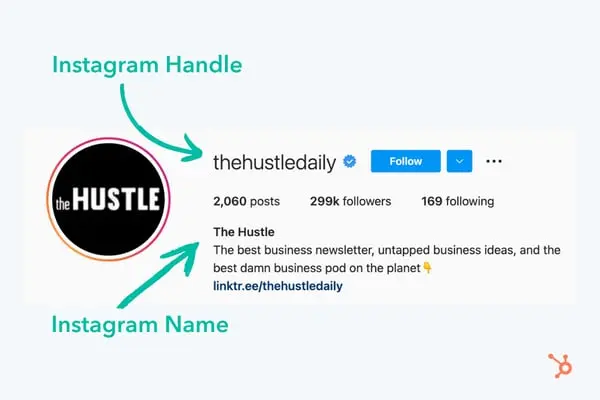
Step 2 — Choosing the Right Username
Your Instagram username is your handle — it appears as @yourusername everywhere on the platform. It is how people tag you, search for you, and find you. It appears in your profile URL: instagram.com/yourusername.
Rules for choosing a great business username:
Keep it as close to your business name as possible. If your business is called “Priya Beauty Studio,” your ideal username is @priyabeautystudio. If that is taken, try @priyabeautystudio.official or @priya.beauty.studio — using a dot to separate words is common and looks clean.
Make it easy to spell and remember. Avoid numbers, underscores in the middle of words, or creative misspellings that people will get wrong when they try to tag you or search for you.
Keep it consistent with your other platforms. Ideally, your Instagram username, Facebook page name, and other social handles should all match. This consistency makes you easier to find everywhere and strengthens your overall brand recognition.
Keep it short. Long usernames are harder to remember and get cut off in some display contexts. Aim for under 20 characters if possible.
One practical tip — before committing to a username, search for it on Instagram to see if it is taken, and also check if the same name is available on other platforms you might use in the future.
Once you set your username, you can change it later — but changing it too often can confuse your existing followers and break any links you have shared with your old username. So choose thoughtfully from the start.
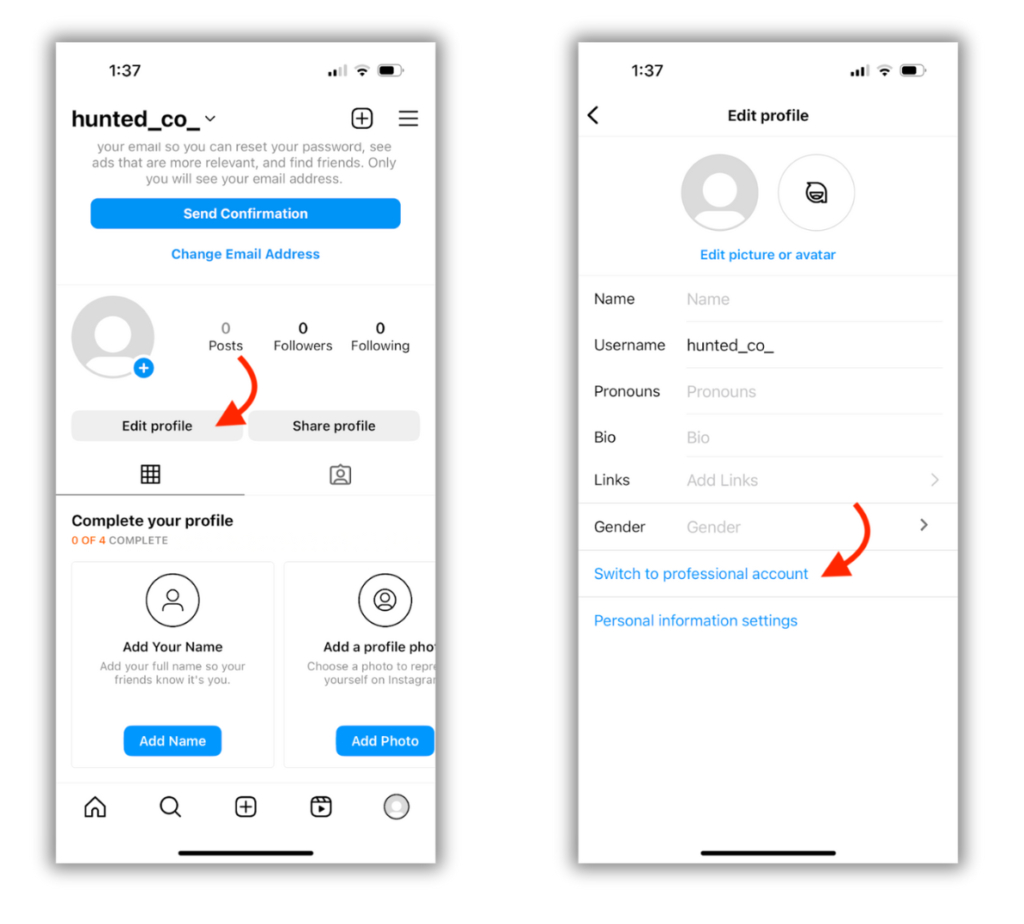
Step 3 — Switch to a Professional Account
This is one of the most important steps that a surprising number of business owners and creators skip.
By default, Instagram creates a personal account. A personal account is fine for individual use — but for a business, a creator, or anyone using Instagram professionally, a Professional Account unlocks critical features that you simply cannot access otherwise.
These features include Instagram Insights — detailed analytics about your followers, your content performance, and your reach. They include the ability to promote posts and run ads. They include contact buttons — phone, email, and directions — that display prominently on your profile. They include access to Creator Studio and Meta Business Suite for scheduling and managing content. And they include category labels that appear under your name, immediately communicating what your account is about.
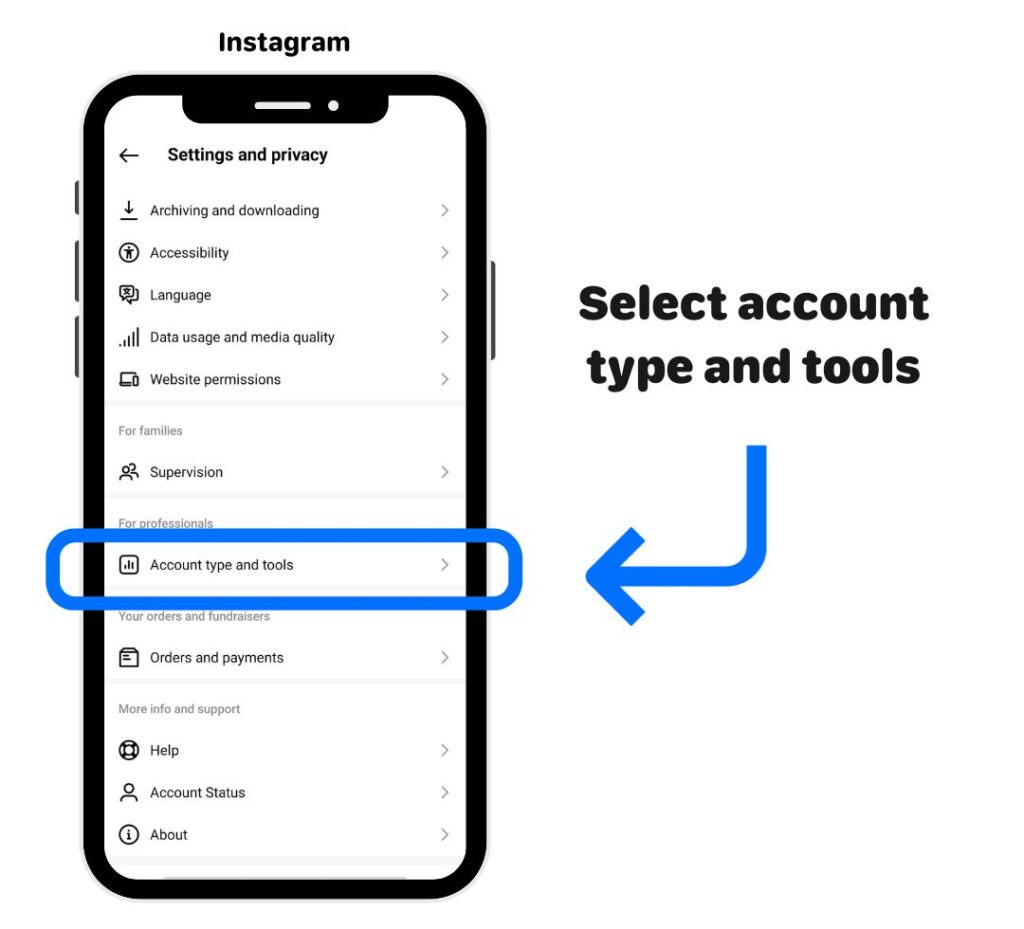
How to switch to a Professional Account:
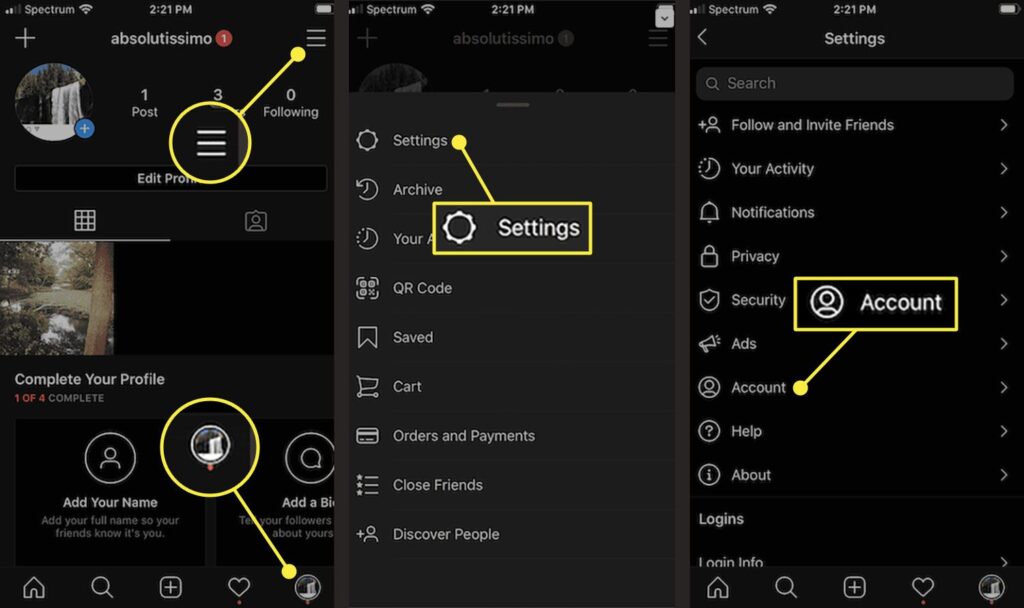
Go to your profile page by tapping your profile photo at the bottom right of the screen. Tap the three horizontal lines (hamburger menu) at the top right. Tap “Settings and Privacy.” Scroll down and tap “Account Type and Tools.” Tap “Switch to Professional Account.”
Instagram will then walk you through a short setup process. First, it will ask you to choose a category — this is the label that will appear under your name on your profile. Options include things like “Restaurant,” “Clothing Store,” “Personal Blog,” “Photographer,” “Digital Creator,” “Health and Wellness,” “Education,” and hundreds more. Choose the one that most accurately describes your business or niche.
Next, it will ask whether you want a Creator account or a Business account. Here is the practical difference:
A Business account is best for companies, shops, service providers, and organizations. It gives you access to all advertising features, the full suite of contact buttons, and integration with Facebook Business Manager.
A Creator account is best for individual influencers, public figures, content creators, and personal brands. It has some slightly different tools around direct message organization and monetization features.
For most businesses, choose Business. For individual creators, choose Creator. Both give you access to analytics and promotional tools.
Part Two — Building Your Profile
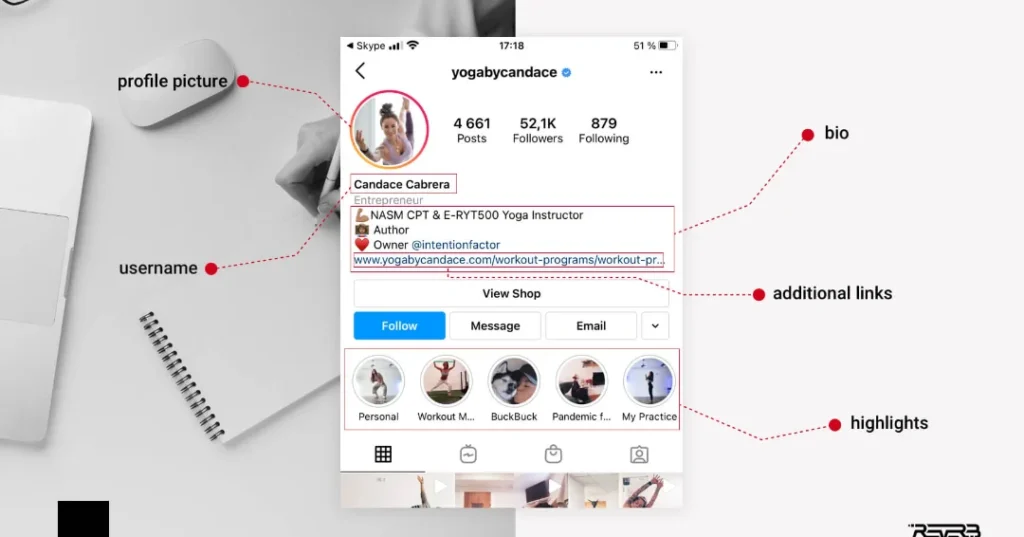
Step 4 — Add Your Profile Photo
Your profile photo is the small circular image that appears next to your username everywhere on Instagram — on your profile, in your followers’ feeds, in comments, in Stories, in search results. It is always visible, always representing your brand.
Because it displays as a small circle — roughly 110 x 110 pixels on screen — it needs to be simple, clear, and recognizable even at tiny sizes.
For businesses: Your logo is the standard choice. Make sure it is centered within the circle, with no important elements too close to the edges that might get cropped. If your logo has a lot of detail or text, consider using just the icon or symbol portion — the part that is most recognizable at a small scale.
For personal brands and creators: A high-quality, well-lit headshot works best. Face forward, good lighting, simple background. Your face at a small size should be clearly visible and identifiable.
Technical details: Instagram recommends at least 320 x 320 pixels, though uploading a higher resolution image (like 1080 x 1080 pixels) gives you more flexibility if the display size ever changes. The image will be automatically cropped to a circle, so compose it with that in mind.
Avoid using images with busy backgrounds, small text, or complex graphics that become unreadable when shrunk. Your profile photo should work as a logo of sorts — instantly recognizable, even in a tiny circle.
To add or change your profile photo, go to your profile and tap “Edit Profile,” then tap the profile photo area to upload from your camera roll or take a new photo.

Step 5 — Write Your Name Field Strategically
When you tap “Edit Profile,” you will see two text fields near the top — Name and Username.
Most people understand the username field, but the Name field is often misunderstood and underutilized.
Here is something important: the Name field is one of the only pieces of text on your Instagram profile that is searchable. When someone types a keyword into Instagram’s search bar, it searches usernames and Name fields — not your bio.
This means you have an opportunity to be strategic here.
Instead of just putting your business name in the Name field, consider including a keyword that your potential customers might search for.
For example, instead of just “Priya Beauty Studio,” you could write “Priya Beauty Studio | Bridal Makeup Delhi.” Or instead of just “Rahul Fitness,” you might write “Rahul Fitness | Online Fat Loss Coach.”
This way, when someone searches “Bridal Makeup Delhi” or “Fat Loss Coach” on Instagram, your profile has a higher chance of appearing in results.
You have 30 characters to work with — use them wisely. Lead with your business or personal name for brand recognition, then add a key descriptor that your audience might search for.
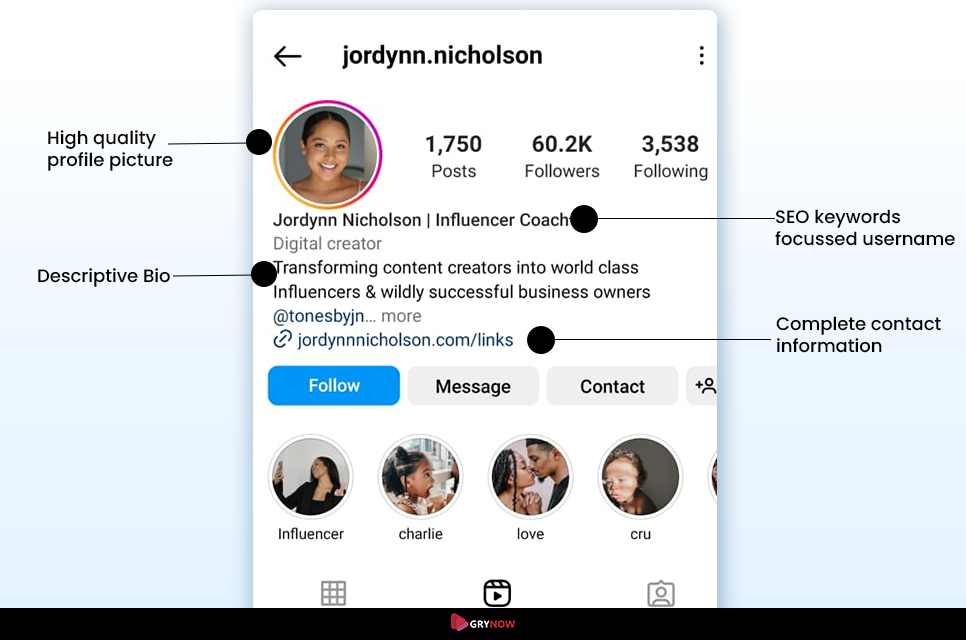
Step 6 — Craft a Bio That Converts
Your Instagram bio is 150 characters of prime real estate. It sits right at the top of your profile, it is the first thing a visitor reads, and it often determines whether someone taps “Follow” or leaves.
A great Instagram bio answers four questions instantly: Who are you? What do you do? Who do you do it for? What should the visitor do next?
Let us break down each element:
Who you are and what you do: Be specific. “Digital Marketing Freelancer” is okay. “I help D2C brands grow on Instagram without spending a fortune on ads” is far better. The more specific and benefit-focused, the more it resonates with the exact person you want to attract.
Who you serve: Not every account needs this explicitly stated, but for service-based businesses and niche creators, naming your audience helps. “For small business owners,” “For working moms,” “Serving Delhi NCR” — these phrases instantly qualify your audience and make the right people feel like your account is exactly for them.
Social proof or credibility indicator: If you have something worth mentioning — years of experience, number of clients served, a notable achievement, a media feature — a single line can establish credibility immediately. “Trusted by 200+ brands” or “10 years in bridal styling” or “Featured in Vogue India” adds instant trust.
Call to action: Every professional bio should end with a clear call to action that tells visitors what to do next. “DM us to book” — “Link below to shop” — “Click to get a free audit” — “Call us at [number].” Make the next step obvious.
Formatting tips: Use line breaks to make your bio scannable. Instagram’s bio editor does not always make this easy — you may need to add line breaks through the Notes app or another text editor, then paste the formatted text. Use relevant emojis sparingly to add visual breaks and personality — but do not go overboard.
A sample bio structure:
What I do + who I help Credibility or unique angle Specific offer or value 📍 Location (if relevant) 👇 Call to action
Example for a wedding photographer: Capturing your most beautiful moments 📸 Delhi’s most-booked wedding photographer 200+ weddings | Available Pan-India 📩 DM for packages & availability 👇 View full portfolio
Example for a digital marketing freelancer: Helping small businesses grow online Instagram & Google Ads Specialist 100+ clients served across India 📞 Free 30-min consultation — DM me 👇 See my work
Write several versions of your bio. Read them out loud. Ask yourself — if a perfect potential customer landed on this profile right now, would this bio make them want to follow and reach out? If the answer is not an immediate yes, keep refining.
Step 7 — Add Your Website Link and Link in Bio Tools
Below your bio, Instagram gives you space to add one clickable link. For most businesses, this is your website homepage, your most important product page, a booking link, or a contact page.
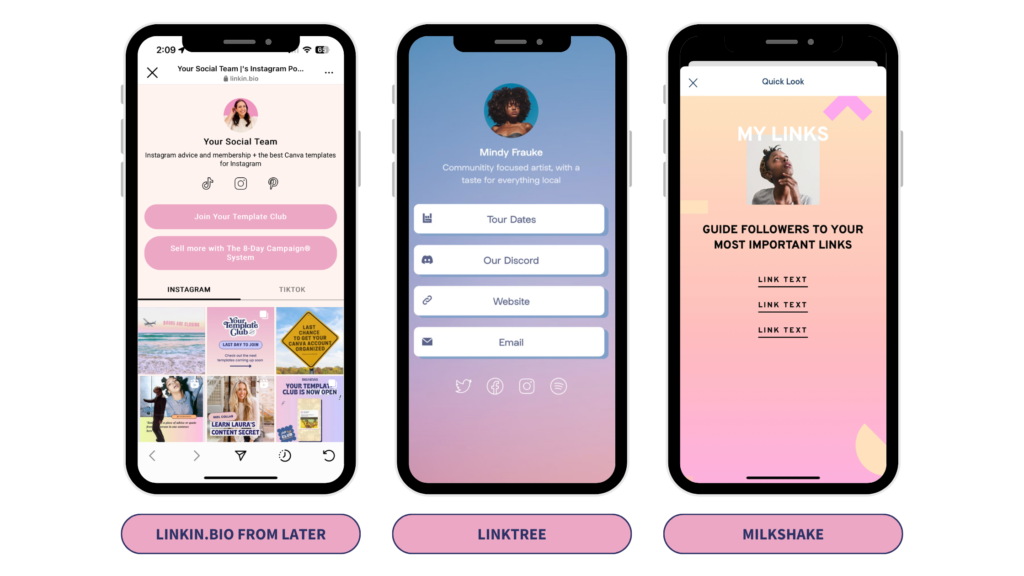
However, one link is limiting — especially if you want to send followers to multiple destinations (your website, your YouTube channel, a current offer, a contact form, etc.)
This is where Link in Bio tools come in. Services like Linktree, Later, or Beacons let you create a single landing page that contains multiple links — and you put the link to that page in your Instagram bio. When followers click it, they see all your links organized neatly.
For a business just starting out, a single direct link to your website or booking page is perfectly fine. As you grow and want to direct traffic to multiple places, explore Link in Bio tools.
When you mention a link in your posts or Stories (where links are not clickable), the standard phrase is “Link in bio” — directing followers to click the link in your profile.
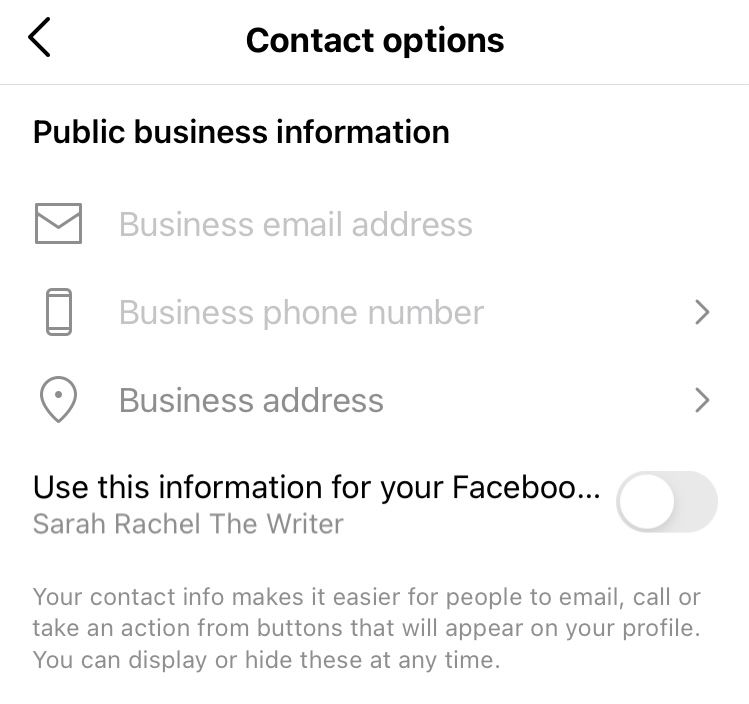
Step 8 — Add Contact Information and Action Buttons
Since you have set up a Professional account, you have access to additional buttons that appear on your profile below your bio. These are powerful for any business that wants customers to take direct action.
Go to “Edit Profile” and scroll down to find “Contact Options.” Here you can add:
Phone number — tapping this on mobile will prompt the visitor to call you directly. If your business relies on phone enquiries, this is invaluable.
Email address — creates a button that opens a pre-addressed email to you. Great for businesses that prefer email communication.
Address — adds a location button that opens maps when tapped. Essential for businesses with a physical location — restaurants, shops, salons, clinics.
These contact details appear as prominent buttons on your profile — they are not hidden in your bio text. Visitors see them immediately and can take action with a single tap.
Additionally, under “Action Buttons,” you may have options to add booking integrations (if you use supported scheduling tools), order food buttons (for restaurants using supported platforms), or other third-party service buttons. Explore what is available for your specific business type.
The goal is to make it as easy as possible for a visitor to take the next step with you — whether that is calling, emailing, booking, or getting directions. Every tap they have to take before reaching you is an opportunity to lose them.
Part Three — Visual Identity and Content Strategy
Step 9 — Define Your Visual Identity Before You Post
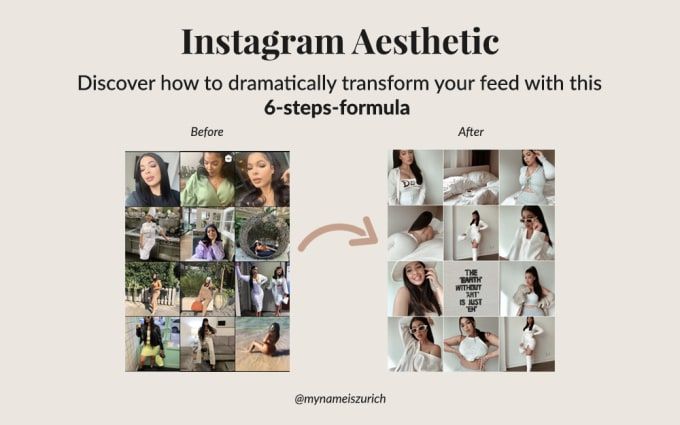
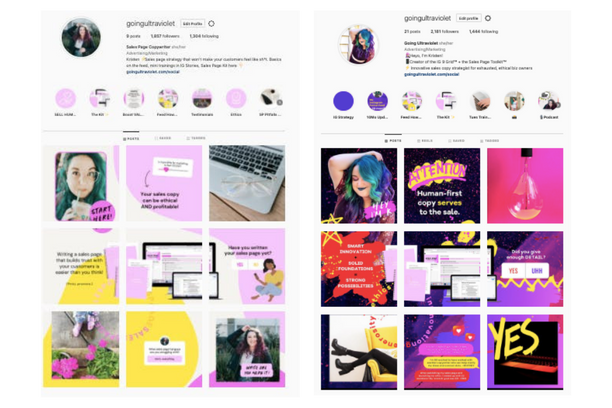
This step happens before you publish a single post — and it is the difference between an Instagram account that looks intentional and professional versus one that looks random and amateurish.
Your visual identity is the consistent look and feel of your content. It includes your color palette, your typography style, the types of images you post, the filters or editing presets you use, and the overall aesthetic tone of your feed.
When someone lands on your profile and scrolls through your posts, they should get an immediate, clear sense of your brand — before they read a single caption. The best Instagram accounts feel cohesive — like every post belongs to the same visual family even when the content varies.
How to define your visual identity:
Start by choosing two to four brand colors. These are the colors that will appear most frequently in your content — in backgrounds, text overlays, graphic elements. They should align with your existing brand colors (from your logo, your website, your physical shop if you have one).
Decide on a consistent editing style for your photos. Do you like warm, golden-toned images? Cool, clean, bright aesthetics? Dark and moody? Pick a direction and stick to it. Many creators use Lightroom presets — preset filters that apply the same edits to every photo — to maintain visual consistency effortlessly.
Determine what types of content you will regularly create. Product photos? Educational carousels? Behind-the-scenes stories? Client testimonials? How-to videos? Knowing your content mix in advance helps you plan and maintain consistency.
Consider how your posts will look together in your feed grid. Your Instagram feed (the 3×3 grid on your profile) is one of the first things visitors see when they land on your profile. Some accounts alternate post types in a pattern — one quote card, one product photo, one lifestyle shot, repeat. Others use a consistent color in every image. The specific approach matters less than intentionality — choose a system and follow it.
Tools like Canva, VSCO, and Lightroom Mobile are excellent for maintaining visual consistency without needing a graphic design background.
Step 10 — Create Your First Nine Posts Before Going Public
Here is a strategy that separates serious Instagram accounts from casual ones: do not go public until you have at least nine posts ready.
Nine posts fills your entire first grid view — the 3×3 layout visitors see when they first land on your profile. An account with nine well-thought-out posts looks established and professional. An account with one or two posts looks like it just started five minutes ago — and many potential followers will not bother following an account that looks like it might go dormant tomorrow.
Your first nine posts should represent a cross-section of your best content — your visual style, your value proposition, your personality, and what followers can expect from your account going forward.
For a business, this might look like:
Two or three product or service showcase posts. One or two behind-the-scenes posts. One or two customer testimonials or results posts. One or two educational or tip posts. One introduction post telling your story.
Write compelling captions for each one. Use relevant hashtags. Make sure each post is high quality — well-lit, well-composed, well-edited.
Having nine strong posts ready before you invite anyone to your profile dramatically increases the percentage of profile visitors who hit the follow button.
Step 11 — Understand and Use Hashtags Correctly
Hashtags are one of Instagram’s primary discovery mechanisms. When used correctly, they put your content in front of people who are not yet following you but are actively interested in what you post about.
How hashtags work: When you add a hashtag to a post, that post becomes part of that hashtag’s feed. Users who search for or follow that hashtag may see your post — even if they do not follow you. Instagram also uses hashtags as signals to its algorithm to understand what your content is about, which influences who it recommends your posts to.
How many hashtags to use: Instagram allows up to 30 hashtags per post. However, more is not always better. Research and testing consistently suggest that three to ten highly relevant hashtags tend to outperform thirty loosely relevant ones. Quality and relevance beat quantity.
How to choose the right hashtags: Use a mix of hashtag sizes. Very large hashtags — like #fashion (hundreds of millions of posts) — are so competitive that your post will be buried instantly. Very small hashtags — like #delhisalonsundayspecial (fifty posts) — have almost no traffic. The sweet spot is mid-size hashtags with tens of thousands to a few hundred thousand posts, where there is real traffic but not impossible competition.
Use hashtags that your target audience actually searches for — not just hashtags that describe your content. There is a difference between #photographylovers (your peers) and #weddingphotographerdelhi (your potential clients).
Create a small set of branded hashtags unique to your business — like #DigitalDrolia — and include them consistently. Over time, these become searchable collections of all your content.
Where to put hashtags: You can put hashtags directly in your caption or in the first comment on your post immediately after publishing. Both approaches work. Many professional accounts prefer putting them in the first comment to keep captions clean and readable.
Step 12 — Master Instagram Stories
Instagram Stories are vertical photo or video posts that disappear after 24 hours. They appear at the top of followers’ feeds as circular icons — and they are one of the most-viewed types of content on the entire platform.
For a professional Instagram account, Stories serve a different purpose than your main feed posts. While your feed is your curated, polished brand showcase — Stories are where you can be more real, more immediate, and more personal.
Behind-the-scenes moments, day-in-the-life glimpses, quick tips, product demonstrations, polls, questions, countdowns to events, customer shoutouts — all of these work brilliantly in Stories format.
Story features to use:
Polls and Questions: These are engagement gold. Asking your audience a simple poll question (“Which colour do you prefer — A or B?”) or opening a question box (“Ask me anything about skincare”) creates direct interaction that deepens your relationship with followers.
Countdown timers: Perfect for building anticipation around a launch, sale, or event.
Links in Stories: If you have a Professional account, you can add links to your Stories using the link sticker — allowing followers to swipe up and visit any URL directly. Use this to drive traffic to your website, a product page, a blog post, or a booking form.
Location tags and hashtags in Stories: Adding these to your Stories makes them discoverable by people who do not yet follow you — similar to how hashtags work in feed posts.
Aim to post Stories several times per week even when you are not posting to your main feed. Consistent Story activity keeps your account visible at the top of your followers’ feeds and signals to Instagram’s algorithm that you are an active, engaged account.
Step 13 — Set Up Instagram Highlights
Instagram Highlights are collections of your Stories that you save permanently on your profile — they appear as circles just below your bio, above your post grid, and they do not disappear after 24 hours.
Highlights are one of the most underused features by small businesses and creators — yet they serve as a permanent, organized information center on your profile.
Think of each Highlight as a chapter in your brand’s story. Common Highlight categories for businesses include:
About Us — your story, your team, your values. Services or Products — a visual showcase of what you offer. Testimonials — customer reviews and success stories. FAQ — answering the most common questions you receive. Behind the Scenes — showing how your business works. Offers — current promotions or deals. How to Order / Book — step-by-step guide for new customers.
Each Highlight has its own cover image — the small circle icon visible on your profile. Design custom Highlight cover icons that match your visual identity — they make your profile look significantly more polished and professional. Canva has excellent templates for this.
To create a Highlight, go to your profile, tap the “+” next to your existing Highlights, select Stories you want to include (from your archive), give it a name and cover image, and save.
Set up at least three to five Highlights before promoting your account. They serve as a mini-website on your profile — giving new visitors everything they need to understand your business and make a decision to follow or contact you.
Step 14 — Connect Instagram to Facebook
If you have a Facebook Business Page (and you should), connect it to your Instagram Professional account. This integration unlocks several important capabilities.
To connect them, go to Settings → Account → Linked Accounts → Facebook and follow the prompts to connect your Facebook page.
Once connected, you can cross-post content between platforms automatically. You gain access to Meta Business Suite — a unified dashboard for managing both your Facebook and Instagram presence, scheduling posts, and viewing combined analytics. You can run Instagram ads through Facebook Ads Manager — which gives you significantly more targeting and control than Instagram’s basic “Boost Post” feature. And your Instagram contact information can sync with your Facebook page for consistency.
This connection is especially important if you plan to run paid advertising in the future. Instagram ads are managed through Meta’s advertising infrastructure — and having your accounts properly linked is a prerequisite for advanced campaign management.
Part Four — Growing and Maintaining Your Professional Account
Step 15 — Posting Schedule and Consistency
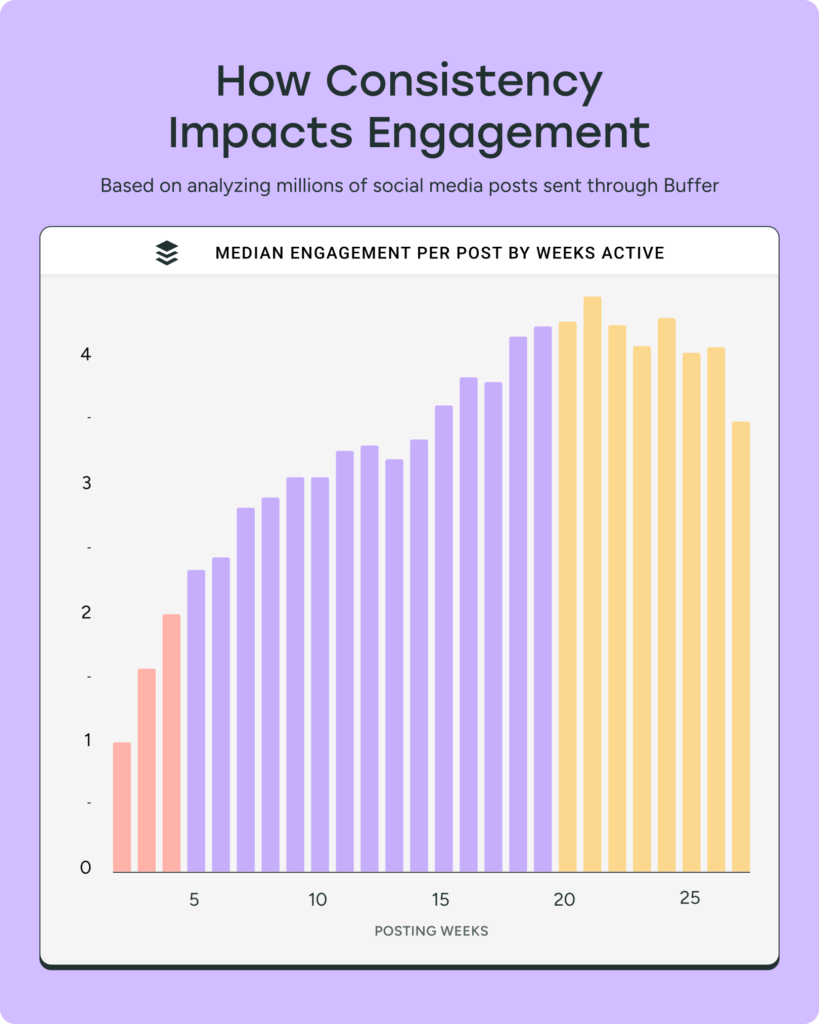
Consistency is the single most important factor in Instagram growth for a new account. It is more important than posting at the “perfect” time. It is more important than using the most trending audio in your Reels. It is more important than having the highest quality camera.
An account that posts three times a week, every single week, for six months will almost always outperform an account that posts every day for two weeks, then disappears for a month.
Why consistency matters so much:
Instagram’s algorithm rewards active accounts. The more regularly you post, the more the algorithm learns about your content and audience — and the more consistently it distributes your content to people who might enjoy it.
Your followers expect regularity. When you show up consistently, people start looking forward to your content. When you disappear for weeks, they forget about you.
Consistency builds momentum. Each post you publish adds to your overall presence, your searchability, your following. The impact compounds over time.
What is a realistic posting schedule?
For most businesses and creators, three to five feed posts per week plus daily or near-daily Stories is a strong cadence. If that feels overwhelming, start with three feed posts and three to four Stories per week — and commit to that schedule before increasing.
The best time to post depends on your specific audience. Instagram Insights (available in your Professional account settings) will show you exactly when your followers are most active — use that data to time your posts.
Step 16 — Engage Actively With Your Community
Posting is only half the equation. The other half is engagement — and most accounts underinvest here dramatically.
Reply to every comment on your posts. Every single one. This is non-negotiable in the early stages of building your account. When you reply to comments, you double the engagement count on that post (which helps algorithmic distribution), you show followers that there is a real human behind the account, and you create genuine connections that turn casual followers into loyal community members.
Respond to DMs promptly. Instagram’s algorithm actually factors in your response rate to direct messages. Beyond the algorithm, a timely response to a potential customer’s DM can be the difference between winning and losing a sale.
Engage with other accounts in your niche. Leave thoughtful comments on posts by other creators and businesses in your space. Not generic “Great post!” comments — actual, specific responses that add to the conversation. This gets you visibility with their audience, and it builds relationships with peers who might collaborate with you, refer clients to you, or simply shout you out.
Use interactive Story features. Polls, question boxes, emoji sliders, quizzes — every time a follower interacts with your Story, Instagram registers that engagement and factors it into how prominently your content is shown to them in the future. More Story interactions mean your account stays more visible to those specific followers.
Step 17 — Explore Instagram Reels
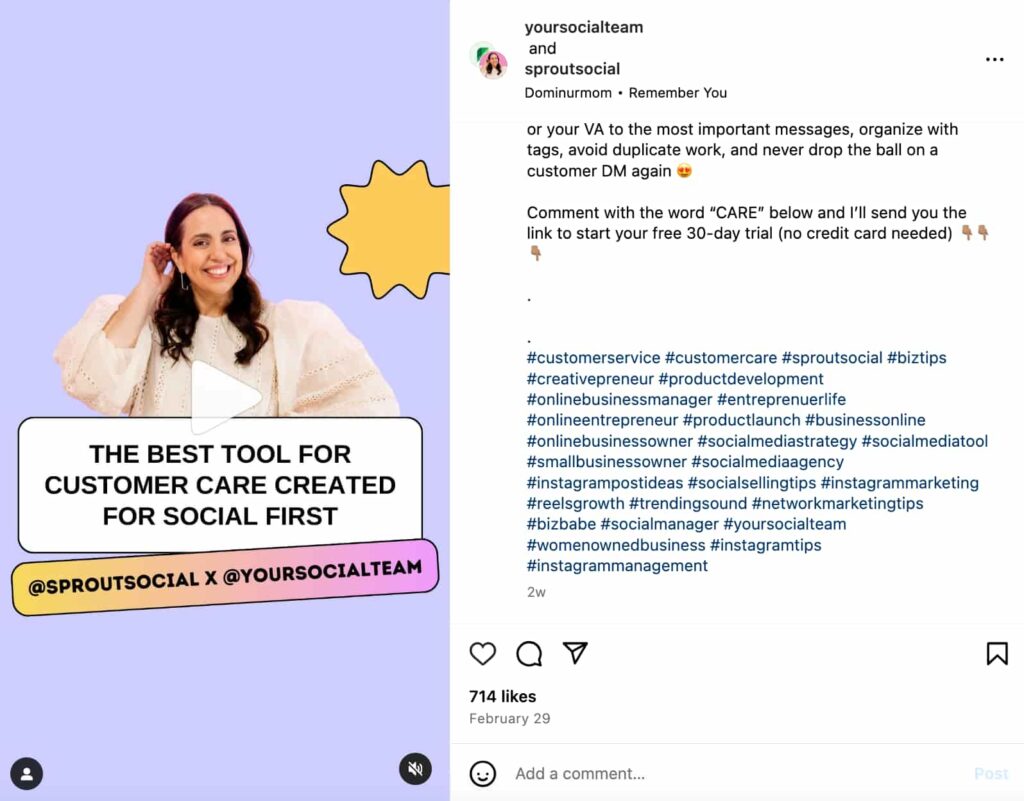
If there is one content format you should prioritize for growth in 2025, it is Reels.
Reels are short-form videos — up to 90 seconds — that Instagram heavily promotes to non-followers through the Reels tab and the Explore page. Unlike regular feed posts which are shown primarily to your existing followers, Reels have genuine viral potential — they can reach thousands or even millions of people who have never heard of your account.
For businesses and creators, Reels represent the single best opportunity for organic reach on Instagram right now. Instagram has explicitly stated that it prioritizes Reels in its distribution — because short video is how the platform competes with TikTok and YouTube Shorts.
You do not need professional video equipment to create effective Reels. A smartphone with decent lighting — natural window light or an inexpensive ring light — is enough. What matters more than production quality is value, entertainment, and relevance.
Great Reels ideas for businesses: a satisfying before-and-after transformation, a quick how-to or tutorial, a day-in-the-life of your business, a myth-busting video in your industry, answering the most common question your customers ask, or a product demonstration.
Use trending audio when relevant — Instagram favors Reels that use popular music or sounds, and posts with trending audio get boosted distribution.
Start with one Reel per week. Track which ones perform best using Instagram Insights. Double down on the formats and topics that get the most reach.
Step 18 — Monitor Your Instagram Insights
Your Instagram Professional account comes with a powerful analytics tool called Insights. Use it. Regularly.
To access Insights, go to your profile and tap the Insights button, or tap the bar chart icon on individual posts.
Key metrics to track:
Reach — how many unique accounts saw your content. This is the most important growth metric. If your reach is growing over time, your account is growing.
Impressions — how many total times your content was seen (including multiple views from the same person). Higher than reach because people often see content multiple times.
Engagement rate — likes, comments, saves, and shares divided by reach. This tells you how much your content is resonating with the people who see it. Saves and shares are weighted most heavily by the algorithm — they signal that your content is genuinely valuable.
Follower growth — how many new followers you gained in a period and from which content.
Profile visits and website taps — how many people visited your profile or clicked your bio link after seeing your content. This tells you how effectively your content is driving action.
Audience demographics — age ranges, gender breakdown, top locations, and active times of your followers. Use this to refine your content strategy and posting schedule.
Review your Insights at least once a week. Look for patterns — which types of posts get the most reach? Which get the most saves? What time of day do your posts perform best? What topics generate the most comments? Let data guide your decisions rather than guesswork.

Step 19 — Common Mistakes That Hold Instagram Accounts Back
You now know what to do. Let us also cover what not to do — because these mistakes are extremely common and they silently sabotage accounts that could otherwise thrive.
Posting inconsistently. Bursting with activity for two weeks and then going quiet for a month is one of the fastest ways to kill your account’s momentum. Instagram’s algorithm deprioritizes accounts that go dark. Your followers forget about you. Set a realistic schedule and stick to it.
Ignoring video content. If you are only posting static images in 2025, you are leaving enormous reach on the table. Instagram’s algorithm clearly and consistently favors video — particularly Reels. You do not have to abandon photos, but incorporating video regularly is no longer optional for serious accounts.
Buying followers. This cannot be said strongly enough — do not do it. Fake followers do not engage with your content. A high follower count with low engagement is a massive red flag to potential customers and collaborators. And low engagement relative to your follower count directly tanks your algorithmic reach — Instagram thinks your content is bad because nobody is interacting with it.
Using irrelevant hashtags. Stuffing your posts with the most popular hashtags regardless of relevance (#love, #instagood, #photooftheday on a business post) does not help you reach your target audience. Use specific, relevant hashtags that your actual potential customers might search for.
Neglecting your bio and profile. Your profile is your homepage. If your bio is vague, your profile photo is blurry, or your contact information is missing — you are losing potential customers every single day. Revisit your profile setup every few months and keep it updated and optimized.
Never engaging with your audience. If you post and then ignore comments and DMs, you are treating Instagram like a billboard rather than a two-way communication channel. Engagement is not optional — it is what builds the community that sustains your account long-term.
Giving up too early. Instagram growth takes time. Most accounts that are thriving today went through months of slow, frustrating growth before things clicked. The accounts that succeed are the ones that stayed consistent, kept learning, and kept showing up — even when the numbers felt discouraging.
Your Professional Instagram Account Setup Checklist
Before you consider your account launch-ready, go through this checklist:
Your account is switched to Professional (Business or Creator). Your username matches your business name and is consistent across platforms. Your profile photo is high quality — logo or professional headshot. Your Name field includes a searchable keyword. Your bio clearly states who you are, what you do, who you serve, and what visitors should do next. Your website link or Link in Bio tool is set up and working. Your contact buttons (phone, email, address) are complete. Your visual identity is defined — colors, editing style, content types. You have at least nine posts published before promoting your account. You have created at least three Instagram Highlights. Your Instagram is connected to your Facebook Business Page. You have a consistent posting schedule planned for the next four weeks.
Every box checked? Your account is ready.
Final Thoughts — Your Instagram Account Is a Long Game Worth Playing
Setting up a professional Instagram account is not a one-day project — it is the beginning of an ongoing commitment to showing up, creating value, and building relationships with the people who matter most to your business.
The businesses and creators who win on Instagram are not necessarily the ones with the biggest budgets or the fanciest equipment. They are the ones who understood the platform, set up their foundation correctly, showed up consistently, and genuinely connected with their audience over time.
You have now done the first part. Your foundation is solid.
The rest — the growth, the community, the business results — comes from what you do next. One post at a time. One Story at a time. One conversation at a time.
Start today. Your audience is already on Instagram, right now, looking for exactly what you offer. Give them a beautifully set up, consistently active, genuinely valuable account to find — and they will find it.
Written by Digital Drolia | Helping businesses and creators build a powerful Instagram presence — from setup to success.